How to port a .NET framework project to .NET Core including tests - A Guide
So you want to port your project to .Net Core and don't know how? Are you reluctant to let go of your traditional .Net Framework targeting but want to have a taste of the new .Net buzz? Is the information on the subject incomplete or too confusing (yes it usually is). Well you have come to the right place. TL;DR This is guide. It will hopefully save you time. Rejoice.

A tale of two frameworks (well actually 3)
I will make this one short and sweet and let this article tell the tale. I recommend to read this article before you continue: .NET Standard - Demystifying .NET Core and .NET Standard.To port or not to port
It depends
- If this is your production code and there is no prospect to run it in a platform other than windows then maybe not.
- If it is a huge complicated project then maybe not
- If it is your open source baby maybe yes
- If it is a new project and you see the benefit of it being cross platform maybe yes
The considerations are many and it is up to you to decide. In any case here is what you need to do.
API Portability
First of all start with this handy tool: .NET Portability Analyzer. It will tell you which API is portable and which is not, to what extent and percentage and what is the alternate API to use. Solutions to less than 100% portability will be briefly discussed further below.
If the solution is too big then it may be wise to check the portability on a project by project basis. At the end of each analysis an .xlsx file is produced with two sheets and the results.
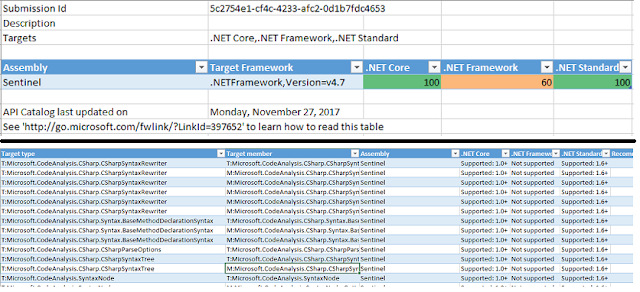
If the solution is too big then it may be wise to check the portability on a project by project basis. At the end of each analysis an .xlsx file is produced with two sheets and the results.

Multitargeting or just port
You may multi-target your project instead of just port it and do the porting little by little on a development branch. One one hand this way you will have more control over the process. On the the hand you may have to use too many preprocessor definitions, depending on the functionality of your application. This is beyond the scope of this post but well within the scope of your analysis on the cost of porting your code.
Multitargeting and tooling
There is none. After you multi-target your project file in the project properties under Application you will notice that the target framework is disabled
This means that on each compilation all targets will be compiled. This also means that you are actually supporting at the same time your legacy and new code as well. It does not mean however that all is smooth. While multi-targeting you may need to use preprocessor definitions to wrap code relevant to your targets.
How to setup your project file
In contrast to the old .csproj file with .Net Core you need not define each and every code file in the project file. The IDE scans the directories and files adjacent to the project file and adds them to the project.
A typical .Net Core project file would start off as such
Whereas a multitarget project will look as such
The .Net Core project has only one TargetFramework whereas the multitargeted has TargetFrameworks in plural. The project depicted above supports Core 2.0 and framework 4.6.1. Notice that each framework defines, in subsequent property groups, dependency assemblies versions. These are updated and added by Visual Studio as you add references along the lifetime of your project. In existing projects update packages via NuGet and let the IDE do its magic.
And that's it. From here on it is a matter of choosing the correct preprocessor definitions while you code. A very good article by Microsoft describes all that in more detail (and for some reason search engines rank it lower than some blogs) Developing Libraries with Cross Platform Tools
Handling tests and solutions files
Once you have your project file setup, open it and fix any compilation errors and make sure it compiles for all targets. Once that is done save the new solution file created automatically for you by the IDE. You will need it in order for the ported test project to reference your codebase.
Next create a project file for your tests and put it in, like the regular project file, adjacent to the code files and directories of the tests. This should look like as such
It is not however created manually. The dotnet cli will do the hard work for us as described in this article Unit testing C# with MSTest and .NET Core. The article assumes you have a solution file. I used MSTest but you can use a number of unit testing frameworks as depicted on the navigation tree on the left hand side of the article.
Final advice
It is advisable to give a different name to your project files while porting. This way you will not be confused if you have to open your project with the old project files for some reason. Also please notice that .Net Core produces a .dll file and not a .exe file. It is runable by using the dotnet cli.
Credit
The incentive to venture into porting a .Net Framework project into .Net Core came to me after an Alt.Net meetup where I saw a small project for mutation testing. The project uses Roselyn to alter the code under test. If the test still passes then it actually does not test something meaningful. If the test fails upon code mutation then the test is considered correct and robust. The project is called SentinelSharp and is developed by Nir Rozen.


Comments
Post a Comment
Keep it clean, professional and constructive. Everything else including ethnic or religious references will be removed.